Classic White Sourdough Bread
This is the base recipe I use for all my white levained bread, which derives from a pain de campagn recipe I’ve modified to suit my taste and bread making style. So I recommend you too play around with the quantities to suit yourself.
You’ll need around 400g of your levain to use in this recipe, so the first stage to this is building up the quanties required from your starter. If you don’t have a starter, then this previous post will get you going.
Stage 1 ~ Building up the levain
308g Levain
265g Water
295g Organic white flour
90g Organic wholemeal flour
Mix all ingredients together well, and place in an airtight container for a minimum of 4 hours.
Stage 2 ~ The final production dough
400g Levain (that you built up in stage 1)
410g Organic white flour
120g Organic wholemeal flour
330g Water at about 27c degrees
12g Salt
Mix the flour and water on slow speed until firm. Add the levain, then the salt and mix for a further 4 minutes on medium speed. Take a look at the dough and make sure all ingredients are being mixed in, then mix on slow for another 4 minutes. If you’re hardcore and kneeding this by hand, then you should be kneeding for about 10 minutes. Or until the dough starts to spring back and firm up.
Shape the dough into a ball, place in a covered bowl and leave for an hour.
Place the dough on a floured surface. With one end, stretch it away from you then fold it back in on itself. Do this again to the opposite end, folding it over the first fold. Repeat the same with the other ends, making every effort to brush off any raw flour before the next fold. When you have folded the fourth side, turn the dough over so the seam side is facing down onto the bench.
With your palms facing up, place the small finger side of your hands slightly underneath both sides of the dough, and twist the dough around slightly towards you about three times. This helps tuck in the seams of the dough, and creates a better shape. Then pick up the dough, and place seam side up back in the bowl and cover for another hour.
Repeat the above stretching step one more time, and if you have a proving basket place your dough in that. Otherwise place it back in the bowl. Cover with a loose fitting garbage bag for another 2 hours.
Stretching the dough accomplishes a few things. Firstly it degases the dough, which could impare fermentaion. It also increases the dough strength by stretching and aligning the gluten strands, thus improving the crumb.
Preheat your oven to 220c.
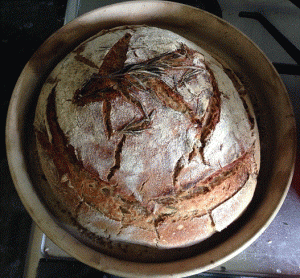
If you have a baking dome (recommended) or pizza stone, then make sure these are also in the oven pre-heating. When your oven has come up to temperature, take your dome or pizza stone out of the oven, and place the loaf on top. Score four ends with a razor or very sharp knife. This creates a weak point from which to control the expansion of the bread.
If you are using a pizza stone or heavy bottomed tray for baking, then in the first 10 minutes of your bake you would need to add a tray of water to the oven. This ensures you get a better colour to your crust, and promotes oven spring which gives the loaf more volume. If you are using a baking dome, then remove the lid after 10 minutes.
Bake for a total of 55 minutes, or until the crust is a golden brown.