This is the base recipe I use for all my white levained bread, which derives from a pain de campagn recipe I’ve modified to suit my taste and bread making style. So I recommend you too play around with the quantities to suit yourself.
You’ll need around 400g of your levain to use in this recipe, so the first stage to this is building up the quanties required from your starter. If you don’t have a starter, then this previous post will get you going.
Stage 1 ~ Building up the levain
308g Levain
265g Water
295g Organic white flour
90g Organic wholemeal flour
Mix all ingredients together well, and place in an airtight container for a minimum of 4 hours.
Stage 2 ~ The final production dough
400g Levain (that you built up in stage 1)
410g Organic white flour
120g Organic wholemeal flour
330g Water at about 27c degrees
12g Salt
Mix the flour and water on slow speed until firm. Add the levain, then the salt and mix for a further 4 minutes on medium speed. Take a look at the dough and make sure all ingredients are being mixed in, then mix on slow for another 4 minutes. If you’re hardcore and kneeding this by hand, then you should be kneeding for about 10 minutes. Or until the dough starts to spring back and firm up.
Shape the dough into a ball, place in a covered bowl and leave for an hour.
Place the dough on a floured surface. With one end, stretch it away from you then fold it back in on itself. Do this again to the opposite end, folding it over the first fold. Repeat the same with the other ends, making every effort to brush off any raw flour before the next fold. When you have folded the fourth side, turn the dough over so the seam side is facing down onto the bench.
With your palms facing up, place the small finger side of your hands slightly underneath both sides of the dough, and twist the dough around slightly towards you about three times. This helps tuck in the seams of the dough, and creates a better shape. Then pick up the dough, and place seam side up back in the bowl and cover for another hour.
Repeat the above stretching step one more time, and if you have a proving basket place your dough in that. Otherwise place it back in the bowl. Cover with a loose fitting garbage bag for another 2 hours.
Stretching the dough accomplishes a few things. Firstly it degases the dough, which could impare fermentaion. It also increases the dough strength by stretching and aligning the gluten strands, thus improving the crumb.
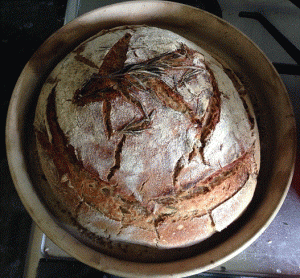
Preheat your oven to 220c.
If you have a baking dome (recommended) or pizza stone, then make sure these are also in the oven pre-heating. When your oven has come up to temperature, take your dome or pizza stone out of the oven, and place the loaf on top. Score four ends with a razor or very sharp knife. This creates a weak point from which to control the expansion of the bread.
If you are using a pizza stone or heavy bottomed tray for baking, then in the first 10 minutes of your bake you would need to add a tray of water to the oven. This ensures you get a better colour to your crust, and promotes oven spring which gives the loaf more volume. If you are using a baking dome, then remove the lid after 10 minutes.
Bake for a total of 55 minutes, or until the crust is a golden brown.
Making bread from scratch can be the most rewarding of experiences, especially if you’re using your own starter. It means you’re in control of the every single aspect of the bread making process, as it’s been you who’ve raised the starter from its origins of just flour and water, into something which is a living and growing thing.
Your starter will become an extra responsibility in your life, so it’s best to accept that at the offset if you want to get into it. Like a puppy or goldfish – it needs to be fed and watered at regular intervals.
The kind of starter that you should keep depends on the kind of bread you will be making. The best rule to go by is to use the same flour in the starter as you would in the loaf. So if you’re going to be making a lot of rye-based breads, then a rye starter is what you should be keeping. When making white-based loaves, then it’s recommended that you use a starter that’s made with white flour. I’ve included instructions on how to begin and maintain both below.
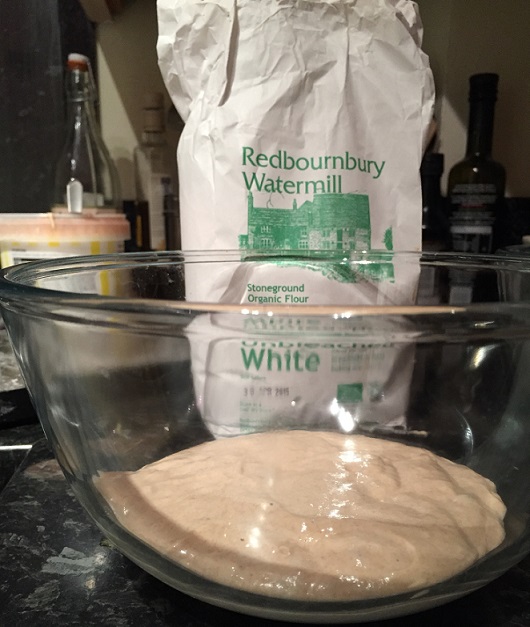
There’s not a lot you’ll need when starting and maintaining a starter. Some recipes state that you need raisons, rhubarb, or even sugar to help your starter get going. Please don’t add these. What is essential is using great flour. Don’t go to the supermarket and pick up the nearest flour that may have the letters ‘rye’ or ‘white’ on the package. That just won’t do. You won’t get the flavours and yeasts that come with a great flour. What you need is an organic unbleached flour, as this still has the nutrients and microorganisms required to get the starter going.
The flours I use in the following are Redbournbury Organic Unbleached white flour and The Priors Organic Rye flour. Both available from Bakery Bits.
I’ve included below a tried and multiply tested recipe for a rye and white (liquid levain) starters.
Rye Starter

Rye starter
Day 1 – making the initial sourdough
225g Rye flour
225g water
Mix the flour and water into a paste, and put into an airtight container. Keep it in something like an airing cupboard where the temperature is consistent for 24 hours.
Day 2
125g initial sourdough
125g rye flour
125g water
You should be getting a nutty smell from the initial sourdough mix, which should have also increased in size slightly.
Mix all the ingredients into a small paste, place into an airtight container and leave
Days 3 to 7
125g initial sourdough
125g rye flour
125g water
Mix all the ingredients into a small paste, place into an airtight container and leave in a warm area. You should do two feedings on these days at 12 hour intervals.As the days progress, you should be getting increasingly maturing yeasty and alcohol smells and tastes from the sourdough. This is the yeasts and bacteria settling into their new homes. After about a week it should start to smell ‘right’ and you can start to use it in your loaves.
Daily Maintaining:
5g initial sourdough
80g water
100g organic rye flour
Mix together in a paste, and keep in an airtight container.
Liquid Levain (White) Starter
white starter (liquid levain)
Day 1
150g rye flour
187g water
As with the rye sourdough starter, mix the flour and water into a paste, put into an airtight container, and place in a temperature-consistent place.
Day 2 (morning)
100g Day 1’s initial mix
45g Rye
45g White
112g Water
Mix ingredients, and put into an airtight container.
Day 2 (+12 hours)
Repeat the Day 2 morning steps
Days 3-5
100g initial mix
90g white flour
112g water
This should be right to use after the fifth day, although don’t expect it to produce a decent loaf for the first few times you use it.
Daily Maintaining:
For optimal health, it’s best to do the following:
16g initial levain
80g water
80g organic white flour
Mix together in a paste, and keep in an airtight container.
 After a recent purchase of a new toy (a large Le Creuset casserole pot), I can’t help but play around with it and try new recipes and ways of cooking things.
Here’s a recipe that always goes down well for casserole chicken:
You will need:
one chicken (around 2kg)
5 rashes bacon
1 leek
12 shallots or a few large onions
250g carrots
2 parsnips
3 cloves garlic
1/2 head brocolli
3 large field mushrooms
2 tbsp oil
250ml vegetable stock
250ml white wine
Preheat the oven to 200c
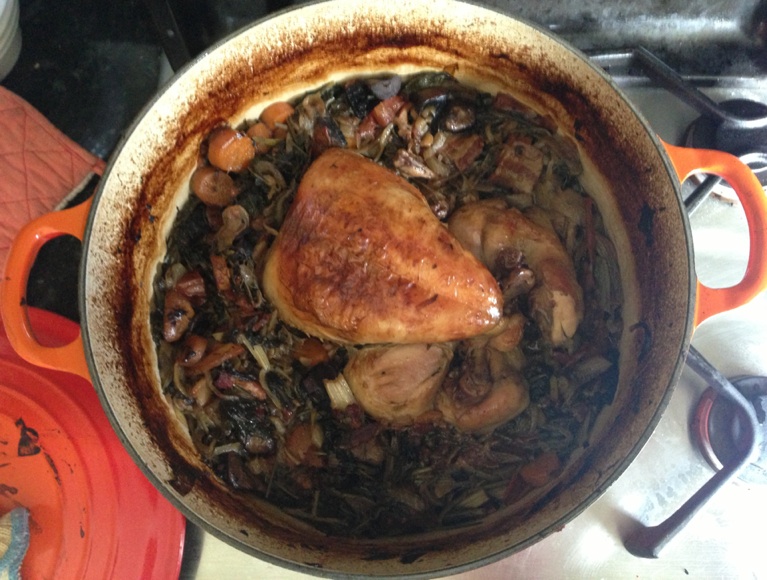
Heat the oil in a large pot. Quarter the shallots, cut the bacon into slices and place both into the pot. Cook on a medium heat until the onion browns. Remove the onion and bacon from the pot, and put to the side.
Place in the chicken, and brown all over. This process should take about 5-10 minutes. Put this to the side as well.
Chop up the garlic, add to the pot with the chopped leeks, carrots and parsnips. Cook for about 3 minutes until tender, then add the sliced brocolli and mushrooms.
Re-add the bacon and shallots, then the chicken.
Pour in the stock and wine until it almost covers the chicken, and cook until it simmers.
Put on the lid, and place the pot in the oven.
Cook for around 110 minutes (20 minutes per 450 grams + 20 minutes of chicken).
Serve with crusty bread, and the remainder of the bottle of wine you used for the stock (so I recommend using a fairly drinkable one).
A few additional notes:
The vegetables I’ve noted here are the usual ones I throw into the pot. Whenever I make this dish, I never use the same amount, or even the same vegetables. I recommend using what’s in season. Adding a few tomatoes usually adds quite a nice flavour to it, and try using red wine instead of white as well.
The chicken I recommend to be organic and free range. I know that this does up the expense, but the price per serving is quite low and it does add excellent flavouring.

Essentials
So I have been challenged by Chablis wines to come up with a recommended takeaway food and wine pairings. As Chablis is already one of my drinks of choice, I feel that I have conducted some unofficial research into this already, so I was excited to get stuck in officially.
I don’t order a lot of take away, as I love cooking. But there is a rather nice Indian restaurant nearby to me, Indian Cinnamon, with whom I have visited a few times for dinner, and have been meaning to visit again. This proved the perfect excuse to try their take-away service for the first time.
What I love about Indian Cinnamon is their approach to their food. They only go for the highest quality of ingredients, so their dishes burst with flavour.
I unfortunately cannot handle a lot of spice with my food, although I do love a bit of warmth. So what I have ordered tonight, and usually order, reflects my rather weak taste buds. This does have the added advantage of keeping the taste buds primed for the Chablis accompanying my food.

the take-away order ready to be plated
The Chablis I chose to have with my meal is a 2011 Louis Michel Petit Chablis. With its floral perfume, and chalky after-taste, it is perfect for what I have ordered.
I started my take away meal with onion bhajis, which I generally have whilst having Indian. Some may say that this is a safe starter to have, although as I pointed out my weak taste bud issue before, if you’re after a more adventurous-eating blog post, then maybe you should click away now.
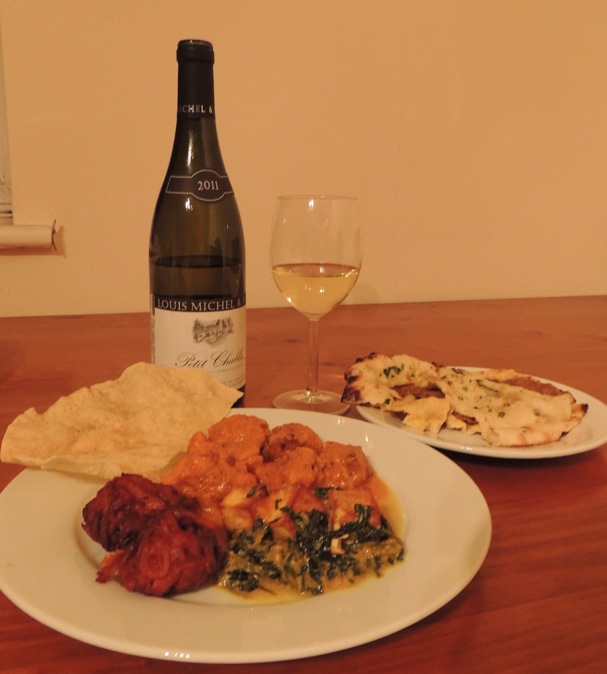
order from Indian Cinnamon
For the main meal, I once again didn’t get too adventurous and went with a classic – the chicken tikka masala. It’s not a traditional Indian classic, more a British-Indian take away classic. As a spice wimp, I love it. The sweetness of the sauce, with the slight warmth from the spice is perfect for my taste buds. And the buttery and creamy sauce is the perfect pairing to the wine.
Along with this I chose a saag poneer to have as a side. The spinach with cottage cheese cubes are a great combination, and once again not overpowering but flavoursome when done right.
A keema naan mopped the masala sauce up perfectly, with the extra and it had the additional mince meat
I unfortunately had no leftovers of the Indian for a cracking lunch the next day, although I did have a few glasses of the Chablis left. So I decided to keep one for myself to have with the rabbit casserole I’ve become fond of cooking.
Indian Cinnamon are open 7 days a week for lunch and dinner.
They can be found at:
42 Devonshire Road
Chiswick
London
W4 2HD
Tel: 020 8994 0544
web: www.indiancinnamon.co.uk/
View Larger Map
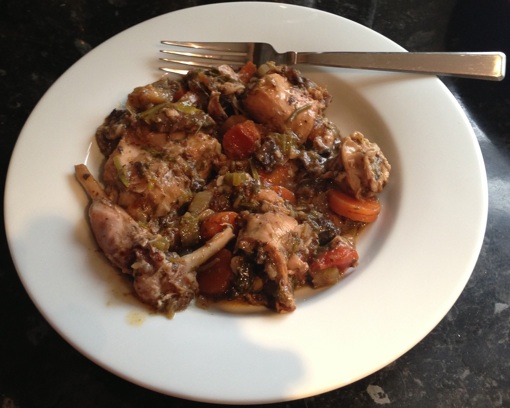
rabbit casserole – serve with your favourite wine
Ingredients:
1 wild or farmed rabbit, cut into around 10 pieces.
4 medium white onions
4 cloves garlic
2 tbsp seeded mustard
1/2 cup flour for covering the rabbit
oil
4 carrots with their leaves
2 medium parsnips
2 sticks celery
3 field mushrooms
3 medium tomatoes
Stock ingredients:
250ml Chablis (or a white / red wine of your choice)
250ml boiled water
1 vegetable stock cube
2 bay leaves
1 tbsp dried / fresh thyme
1 tbsp mixed dried herbs
Method:
Pre-heat the oven to 180 degrees Celsius.
Coat the rabbit pieces in the mustard, and cover with flour.
Dice the onions, and garlic, then add to a casserole pot with a few tablespoons of oil.
Add the rabbit, and cook on a medium-high heat until the rabbit is browned all over. Remove from the pot.
Chop the carrots, parsnips and celery and add to the pot. Cook on a medium-low heat until the carrots are softened.
Add the chopped tomatoes and mushrooms, then add back the rabbit and onions.
Combine the Chablis, boiled water, stock cube and herbs in a separate jug, then pour over the pot.
Simmer the ingredients for another 10 minutes, then transfer to the oven for 90 minutes, stirring occasionally.
Serve with your favourite white wine.
 My particular alfajore consumption habit was picked up from a Portuguese pastry stall in the Upper Thatchbrook Street Market in Pimlico, London.
I was not previously aware of these light, sweet biscuits with a glorious caramel inside until one particular day I needed an afternoon sweet pick me up.
So on many occasions after that I revisited that stall and became quite a regular, until a few months later the stall was closed as the owner wanted to concentrate on her family. My supply chain had been cut off. So there was only one thing to do – create them myself.
After a few recipe misses, here’s the recipe that worked for me:
You’ll need:
112g butter 112g caster sugar
4 large egg yolks, lightly beaten
1 teaspoon vanilla extract
2 Tablespoons brandy or milk
1 teaspoon lemon zest, freshly grated
2 cups all-purpose flour
150g cornflour
1/8 teaspoon salt
1/2 teaspoon baking soda
1 teaspoon baking powder
1 can condensed milk
coconut for dusting
To prepare the dulche de leche:
Microwave the condensed milk on medium for two minutes.
Stir , then microwave on medium for another two minutes.
Stir again and microwave on medium-low power for another 20 minutes or until it turns to a thick and caramel color. Remembering to stir every few minutes.
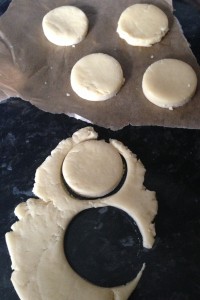
Cutting the dough into shape
Preparing the biscuits:
Cream the butter and sugar. Mix in the egg yolks, then the vanilla, brandy (or milk) and lemon zest. Set aside.
In a separate bowl, mix the flour, cornflour, salt, baking soda and baking powder.
With your hands, work together the dry mixture to the butter until combined and soft. Put it in the fridge to rest for an hour
Preheat the oven to 170 degrees centigrade.
With half of the dough, roll out onto a floured surface to about 5mm thick.
Using a rounded object such as a glass for a cutting template tool, cut out the dough into circles and transfer to a baking tray lined with baking parchment.
Bake for 12 to 15 minutes, until slightly golden.
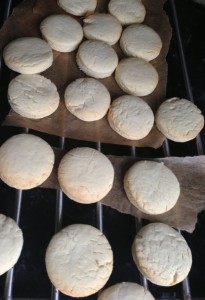
Biscuits just out of the oven
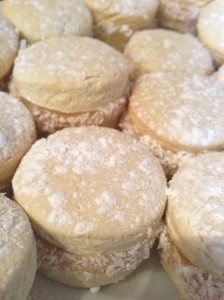
Final preparation:
Cool the cookies, and spread the dulche de leche onto the flat part of one cookie.
Place another cookie on top and squeeze until some of the dulche de leche oozes out.
Roll in coconut, and sift some icing sugar on top.
Eat.

Nestled in the beautiful Tuscan hills, not far from Florence lies the farmhouse and surrounding farm of Castello de Trebbio. Built by the Pazzi family in 1184, the famhouse, or castle as is probably best describes it, strikes an imposing figure in the little village it’s located in.
The Pazzi family were renaissance-era Florentine bankers who were second in power to the Medici family. On the 26th April 1478, the eldest Pazzi brothers Salviati and Francesco (with the blessing of the current Pope), plotted to kill Lorenzo and Giuliano de’ Medici. They succeeded with killing Giuliano during mass, although Lorenzo escaped. As a result the Pazzi family were stripped of its nobility, its land and investments, and its seal removed from every public space in Florence.

Wine barrels
Most of the family were hung to death in public spaces. Salviati was hung from the Palazzo Vecchio, where Leonardo di Vinci sketched his lifeless body.
After that event, the Medici family took over Castello de Trebbio, and transformed it into a villa. It has had various owners over the centuries, and its current owners have been in residence since 1968.
The villa’s surrounding farmland has 60 hectares for grapes, and around 10,000 olive trees. Saffron is also grown in the fields.

Castello deTrebbio main produce is Chianti Superiore. As stipulated in the Denominazione di Origine Controllata e Garantita (DCOG) guidlines, the winery can use the Chianti name as the grapes are grown in the Florence region, and the wine blended with at least 80% sangiovese grape. Although they use a 100% sangiovese grape.
They also produce a grigio / reisling blend, with wine production totalling around 300,000 bottles a year.

Barrel viewer as designed by Leonardo Da Vinci
Throughout the villa, the history and previous uses of each room are felt. The room where the plan to kill the Medici family leaders had the remnants of its outcomes, with a defaced coat of arms over the fireplace.
Barrels of wines are kept with hooks on the walls used by the Pazzi family’s army to restrain prisoners.

Platter of local produce
The notable people who have had associations with the winery are also present. On each wine barrel, there is an upturned glass bottle sticking up from the top. This was designed by Leonardo Da Vinci, to enable the wine makers to peer inside each barrel to view the contents without opening it.
There is one seal of the Pazzi family that was kept from being defaced, which is located in the courtyard. This is because it was sculpted by Donatello himself.
And, at the end of the tour, a few wines and food were tasted.

Chianti Rufina Riserva Lastricato 2008
A platter of food with spreads such as olive from their own trees spread on ciabatta was tasted.
This was had with a glasses of their reds – the Chianti Rufina Riserva Docg 2008 Lastricato and the heavier, more blackberry flavoured Annata.

Vin Santo Del Chianti 2001
The desert wine of Tuscany, a Vin Santo was also tasted. Made from the trebbiano toscano grape, a biscotti is a traditional pairing, being dipped into the glass.

It seems as though ramen’s the dish of the season. With the weather getting chillier, it’s perfect for a cold night, and it’s a lighter alternative to the traditional stew.
Restaurants such as Bonedaddy’s are taking advantage of this resurgence, along with Japan Centre opening Shoryu Ramen, and Tonkotsu also offering the dish.
Now it’s time for YO! Sushi to join that club. They’ve had Ramen on their menu for a while in smaller quantities, but this winter they’ve launched their own Ramen menu.
Created by the executive chef Mike Lewis, there are 5 seperate dishes on offer, all with a shoyu broth with pickled bamboo shoots and fresh ramen noodles. There’s the miso-dare (chicken), chashu (pork), five spice gyu (beef), kaisen (fishcake) and kitsune (vegetable).
They’re served in quite a hearty-sized bowl, and quite reasonably priced at £7-£8. So perfect also if you want a quick take away.

When I was invited down to their Southbank restaurant to taste the menu, I had the five spice gyu (beef) ramen.
It needed an extra kick of garlic paste and chili, although this added to the warmth of the dish.
Whilst there, may I also recommend the desert I usually get – the dorayaki, which is Japanese pancakes with custard filling and raspberry sauce. I can’t stop at just the one plate though, so be careful yourself.
A whole Saturday spent learning about bread at particle level detail, making it and then baking it. It was a great way to spend the day.
This day was all thanks to Barm Bakery, and the man behind it Aldo Peternell. He has been obsessing and developing his baking for a number of years, and building up the knowledge he’s been gathering along the way. Quite often it’s only with his friends that he discusses this knowledge with. But it was all thanks to a chance meeting with Laure at a bloggers lunch, and his habit of byob (bringing your own bread), that it was she who convinced him that he should impart this knowledge on fellow foodies by holding a workshop.

pre-prepared levains
It was a tight schedule. We were to make and bake 4 loaves in just a day, whilst learning about the how, where, when and why of each process.
The loaves we were attempting were a tourte auvergnate, pain de meteil, pain de mie, and a gateau battu if we were lucky.
Luckily the levain (or the chef or starter as it is also referred as) was already pre-prepared the night before, or else there would’ve been hours of watching yeast grow.
For each loaf, and as in baking in general, exact measuring is important. This ensures reliability and consistency. The salt amount effects the colour and gluten development of the dough. The temperature of the water going in effects the natural yeast production, as if it’s too hot or cold then it won’t develop. And you also must keep the temperature of the room where you prove the doughs at a constant temperature.

bread dough ready for fermentation
The flours used were all organic, as they contain more natural yeasts, which ensures the bread is naturally levained.
The first of the loaves baked was a tourte auvergnate. This has a 75% rye to a 25% wheat flour ratio. These percentages are referred to as ‘bakers percentages’. This means that the flour quantity is 100%, and all other ingredients are percentages of that. So in this loaf, the ingredients were:
T85 rye flour – 712g (75%) + T55 wheat flour – 237.5 (25%) = 100%
water – 664.5 – (70% of the total flour)
salt – 17g – (1.8% of the total flour)
levain – 475g (25%)
You may notice that the bread used is described with a ‘T’ in the front, then a number. This is the continental classification system. The lower the number, the lower the mineral content and the more refined it is. So a T45 flour is generally used in pastries and pasta, whereas a T85 is used for wholemeal breads.
When mixing ingredients, generally the order in which you add the ingredients is: water, salt, flour, then the levain. These were mixed for 10 minutes, fermented for an hour, then folded and prooved in a banneton basket for another 1 3/4 hours. The banneton (or proving) basket supports the dough shape whilst it’s rising.

proved torte auvergnate
The proved dough is then placed on a baking sheet on a pizza stone in the oven for 25-30 minutes on 230c. A baking dish with water is also placed in the oven to add moisture.

baked tourte auvergnate
The loaf is ready when it is golden in colour (as shown above), and sounds hollow when you tap the bottom.
The other loaf made was a pain de metheil. The difference between this one and the tourte auvergnate is that it also includes a darker rye. So the baker’s percentages were:
T55 wheat flour 50%
T85 rye flour 25%
T170 rye flour 25%
water 65%
salt 1.6%
The process was also the same in the mixing and fermentation. The proving was done in a lined wiker proving basket. It was also scored to control the expansion of the loaf, so it wouldn’t burst in random places whilst rising in the oven.

pain de meteil
The previous loaves are also described as ‘lean breads’. This means that their main ingredients are flour, water and salt. The two other loaves baked on the day, pain de mie and gateau battu are what are referred to as ‘rich loaves’. These are loaves have also milk, butter and sometimes sugar.
They also are made with a higher-extraction flour. In this case a T55 wheat flour. They are also made with fresh yeast, rather than with the sourdough levain used in the previous loaves.
The pain de mie is made up with the following:
T55 wheat flour 100%
Milk 32%
water 25%
sugar 3.5%
butter 5.5%
salt 2%
yeast1%
The dough is folded 2 times during fermentation. This removes some of the build up of gasses, which may inhibit the yeast development, and strengthens the gluten.

folded pain de mie dough
It is then baked in a square tin, with a lid which determines its shape as a square tin.

pain de mie
Unfortunately time ran out for my favourite – the gateau battu. This loaf includes around 9 egg yolks, 5 egg whites and a slab of butter. So I guess this was a good thing for my cholesterol.
Whilst we were baking the loaves, Aldo also prepared his signature sourdough loaf. I have yet to find any other bread that betters this. Hedone’s bread comes very close, with St. John futher behind. The exact ingredients are a secret, and he’s put in hundreds of hours to perfect this loaf.

Barm Bakery sourdough

Halved Barm Bakery sourdough
There are plans for future bread workshops in the pipeline. If you are interested in joining in, then please contact me through this blog and I will pass on your details.
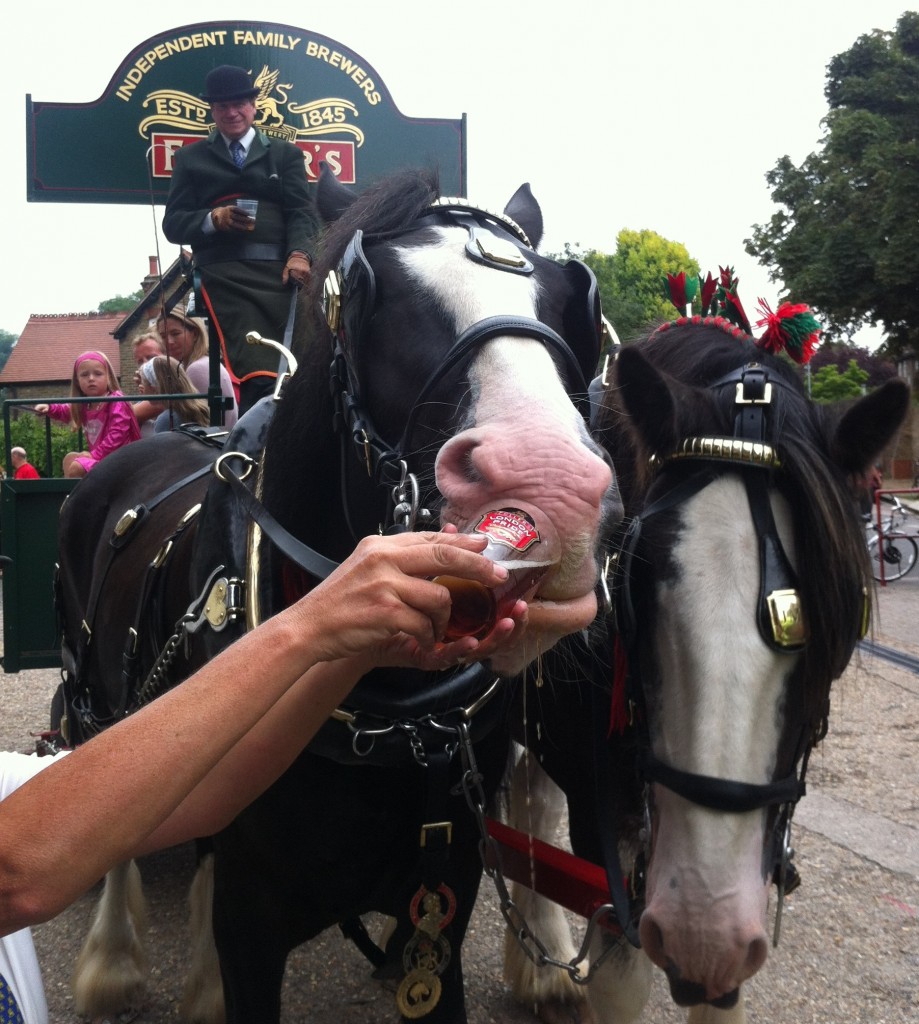
Thirsty
Every year, the Fullers Brewery in Chiswick throws open their doors and holds an open day. Usually one of the highlights is a tour of the brewery itself, as it not only takes you through the brewing process, but you get to walk a space with over 350 years of brewing history.
Unfortunately all tours were booked out by the time we arrived, but that didn’t mean that we couldn’t enjoy the day’s other delights.

Cellar bar rooms
The cellar bar room is the perfect space for an enterprising pop-up restaurateur

Cellar door shop
Exit through the cellar door shop.

Cracking crackling
Obligatory food shot. Yes, the crackling was perfect!